Add a new question: Fill in the blanks
This article describes how you can add a new question of fill in the blanks type, to your biz:Examiner authoring environment.
The first steps
Adding a new question is common across all question types. To see how to add a new question, see Add a new question.
Add new fill in the blanks type question
In the fill in the blanks type questions, the participants can answer a question by filling in the blanks in the question statements.
To add a new fill in the blanks type question, follow the steps below.
- Select ‘Fill in the blanks’ as the question type. The ‘New question’ dialog box opens that shows the question type as ‘Fill in the blanks’.
- In ‘Title’, write the title of this question. This title appears in the list of topics.
- In ‘Language’, select a language that you want to use in the question.
- In ‘Tags’, write one or more tags for this question. These tags can be the keywords for this question that you can use to search a question anytime.
- Click on ‘Create’ to save this new question. You can click on ‘Back’ to select another type of question to get started.
When a new question is added to the list of topics, a yellow color icon shows in the topic title. It means that the question is not activated.
Complete the question details and advanced settings
The ‘Question text’ tab
The ‘Question text’ tab is selected by default. Write the question text here.
Text editor for formatting
A text editor is available to format the question content for styling options. Please see Common reference to add a new question: Using text editor, for the detailed instructions.
The menu options
The text editor shows a menu bar where a set of menus show you the basic text editor options, and a few additional and advanced actions to set up the right structure of the questions’ text as required. Please see Common reference to add a new question: Using menus, for the detailed instructions.
Instruction
You have an option to add an instruction for this question. Instructions are common for the same question types. If another ‘Fill in the blanks’ type question already has one or more instructions in any language, these instructions are available in this new ‘Fill in the blanks’ type question in the same language, for your use.
- Click on the ‘Edit’ icon and the ‘Edit instructions’ dialog box opens.
- Click on ‘Add instruction’.
- In ‘Language’, select a language for the instruction text.
- In ‘Instruction text’ write the content for the instruction.
- Click on ‘Save’ to save this instruction.
Follow the same steps to add more instructions and you can select any one instruction, anytime when you edit this question.
The ‘Text with blank spaces’ tab
Select the ‘Text with blank spaces’ tab to write the text that includes blank spaces where the participants need to fill in.
Add text and blank spaces
Click on the ‘Edit’ icon to change the statements and use the square brackets for the blank spaces. For example, see below.
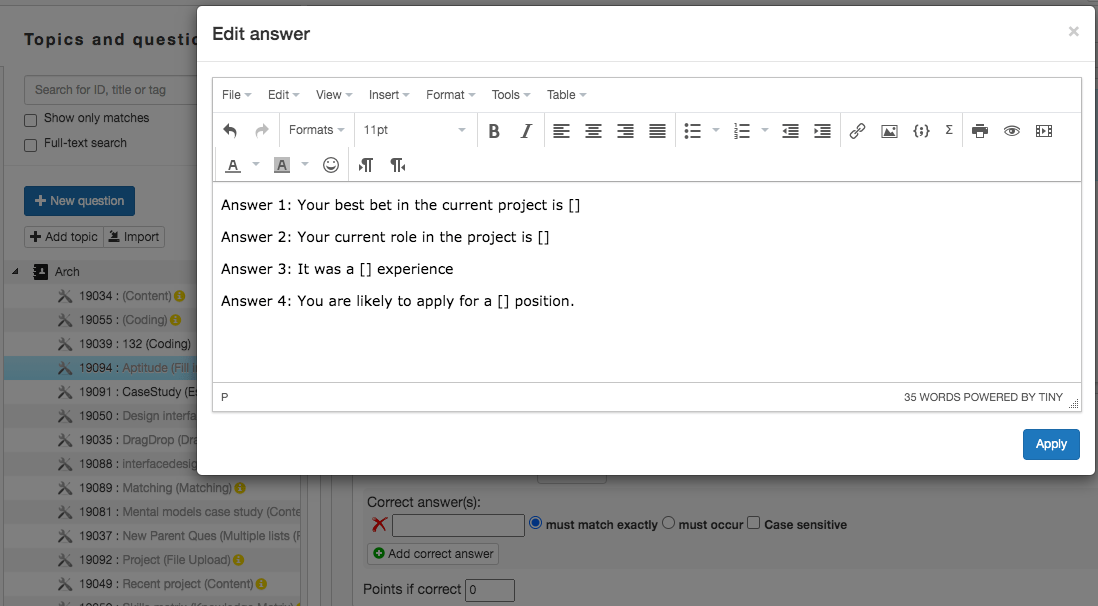
Click on ‘Apply’ to save the question’s content that includes the blank spaces. You can edit these anytime.
Each blank space shows a sequence number as a superscript, and you can set up advanced settings for each blank space, differently, for the participant’s answering experience. For example, the same four blank spaces in the above example, appear as below.
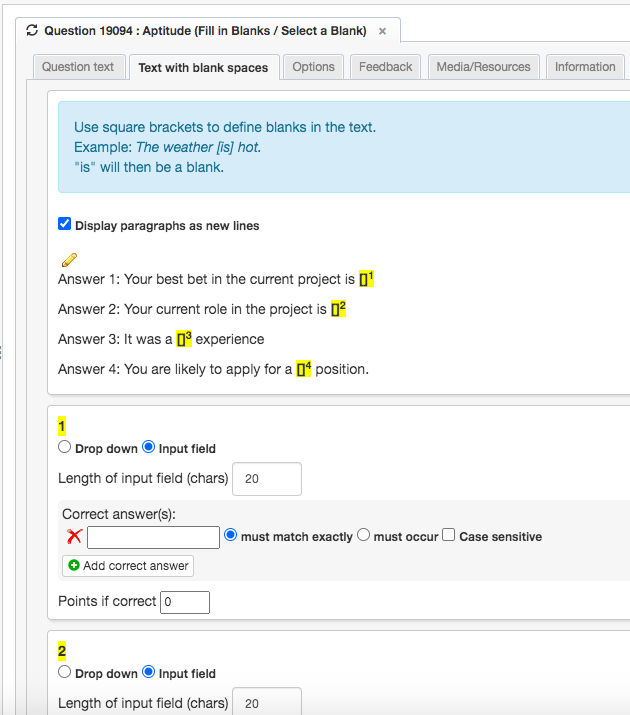
Settings for blank spaces
For each blank space, you can set up different options and settings for how the participants respond to this question.
- Select ‘Drop down’ to show this blank space as a drop-down.
- Select ‘Text input field’ to show this blank space as the text input field. The participants can add only text in the blank space.
- Select Numeric input field’ to show this blank space as the numeric input field. The participants can add only numbers in the blank space.
In ‘Length of input field (chars)’, write the number of characters that the participants can use to fill in the blank space.
Correct answers
When you write the correct answer against which the participants’ response is matched to evaluate their exam, you can define advanced settings for how the response is matched.
In ‘Correct answers’, write the correct answer for this blank space.
- Select ‘Must match exactly’ to match the exact answer. For example, matching ‘hands’ with ‘hand’ will be considered as an incorrect answer.
- Select ‘Must occur’ to match the participants’ response with the correct answer, even partially.
- And, select ‘Case sensitive’ if you want to match the actual answer with the participants’ response for the letter case as well.
Click on ‘Add correct answer’ to add another correct answer, and follow the same steps to define custom settings to match the answers.
If you set up two or more correct answers for the same blank space, the participants’ response is matched to any of these answers. For example, you can use this option to give them choices for a correct answer. In this case, any of the correct answers are marked as the correct answer and the participants score the points depending on the evaluating settings that you set up in the ‘Options’ tab.
Note: At any stage while planning the answers and their settings, click on the ‘Preview’ tab to see how the participants see this question.
The ‘Options’ tab
Evaluation settings
The ‘Evaluation settings’ enable you to set up point scoring settings for the question.
In ‘Evaluation type’, there is an option to set up the point scoring for the entire question or for each answer in the question.
- Select ‘Award points per answer’ option to award the points for each answer within this question.
- Select ‘Award points for question’ option to award the points for the entire question.
Points settings
- In ‘Negative points possible’: Select ‘Yes’ if the participants can secure negative points for this question and select ‘No’ if the participants cannot secure negative points for this question.
- In ‘Define max points for question’: Select ‘Yes’ to set up a max points that participants can score for this question, and select ‘No’ if there is no max points limit.
- In ‘Ignore question in result calculation when not answered’: Select ‘Yes’ if you want that the points scored in this question are not included in the exam result, if the question is not answered. For example, if the exam settings mean that an unanswered question invites some negative score. In that case, this setting here in ‘Ignore question in result calculation when not answered’ enables you to bypass that exam setting.
- Select ‘Only award points for first occurrence if the same answer is given in multiple input fields (only applies to text fields with ‘must match exactly’)’ It helps in certain cases where the question has two correct answers. If you want that the participant should not use the same answer for both fields, selecting this option means that the points will be awarded only for the first correct answer.
General settings
In ‘Show info overlay when jumping to the question’, you can add and use information overlays to add additional messages. For example, a tooltip like help text for the participants when they are in an exam. Please see Common reference to add new question: Using info overlays for more details.
Select ‘Show question text in split panel (not available in preview)’ to show the question text in a column view when the participants answer this question. Select ‘show in left panel’ or ‘show in right panel’ to show the question in the left side or right side column of the answer space, respectively.
The other tabs
For the instructions on the ‘Options’ tab, the ‘Feedback’ tab, the ‘Media/Resources’ tab, the ‘Information’ tab, the ‘Topics’ tab, and the ‘Preview’ tab, please see Add a new question for details.
Save options
- Click on ‘Save’ to save these details in the question. When you use the ‘Save’ option, the question does not impact the exam if it is added to an exam. In a way, the question is saved as a draft and you can add it to an exam, anytime.
Click on ‘Save and activate’ to save the question, and to activate it. This means that the question is ready to be added to an exam. If you make any changes in the question or its settings after you use ‘Save and activate’, the question is saved as the next revision for an exam. Please see Questions – Common Reference to Add New Question: Revisions and Exams for more details.