Using the bizExaminer LearnDash Extension
This article describes how you can use the bizExaminer LearnDash extension for WordPress to connect bizExaminer with your LearnDash setup.
With our LearnDash extension, you can use all the LMS features of LearnDash and let bizExaminer handle the quizzes. This allows you to configure quizzes directly in LearnDash and connect them with courses, lessons and other prerequisites, but also using bizExaminers advanced question types and security functions.
Prerequisites
- WordPress installation
- LearnDash WordPress Plugin
- bizExaminer LearnDash extension
- bizExaminer Account and associated API credentials
This tutorial assumes you have a working WordPress installation together with the LearnDash plugin.
It also assumes that you have a bizExaminer account. You can request an account through this form.
Installing the extension in your WordPress instance
In your WordPress instance which has LearnDash installed, you have to find and install the bizExaminer LearnDash extension.
- Login as WordPress WP-Admin.
- Go to Plugins > Add New.
- In the Search bar, search for ‘bizExaminer LearnDash’.
- Click on Activate to start the activation of the plugin.
Alternatively, you can also download the plugin from the WordPress plugin repository and upload the zip.

Search for "bizExaminer LearnDash" in the WordPress.org plugin repository and click "activate".
- After the installation is complete, and the plugin is activated, click on LearnDash LMS.
- Select Settings.
- Select the bizExaminer tab on the right.
- Add a Name for the API key entry; Note: this name will show up in the LearnDash quizzes configuration screens.
- Enter the Instance Domain for your bizExaminer instance, i.e. yourcompany.bizexaminer.com, without the www/http.
- Enter your bizExaminer API credentials by copy/pasting them into the API Key Owner and API Key Organization fields. If you don’t have them, reach out to bizExmainer support here.
- Click Add API-Credentials to confirm.
- Click Save to store the configuration.
- Optionally: You can test your credentials by clicking “Test” for a credential-set. The page will reload, and you will get a success or error message.
You can add multiple API credentials to work with different content owners or even on different bizExaminer instances.

Adding API-credentials: Add a name, the bizExaminer instance domain and the keys.

You can test your credentials by clicking “Test” for a credential-set. The page will reload, and you will get a success or error message.
Creating a quiz and connecting it with a bizExaminer exam
After you have configured the bizExaminer LearnDash extension, you can continue to create your first quiz and connect it with a bizExaminer exam.
If you have already an existing quiz in LearnDash and want to use it, you can skip to step 3.
This step requires creating an exam module in bizExaminer. If you haven’t created one, see this support article for how to create your first exam
- Log in to WordPress WP-Admin.
- Go to LearnDash LMS.
- Go to Quizzes.
- Select Create new quiz.
- Open the Settings tab of the quiz.
- Scroll down to the bizExaminer Settings section.
- To connect the quiz to bizExaminer switch the toggle bizExaminer exam to ON.
Note: After you’ve enabled the bizExaminer integration for a quiz, LearnDash’s quiz builder is disabled. You can still use the content builder for adding content to the quiz page.

To connect the quiz to bizExaminer switch the toggle bizExaminer exam to ON.
- Select the correct API credentials for the quiz by using the API Credentials pull-down field.
- From the Exam Module list, choose an existing exam module from bizExaminer.
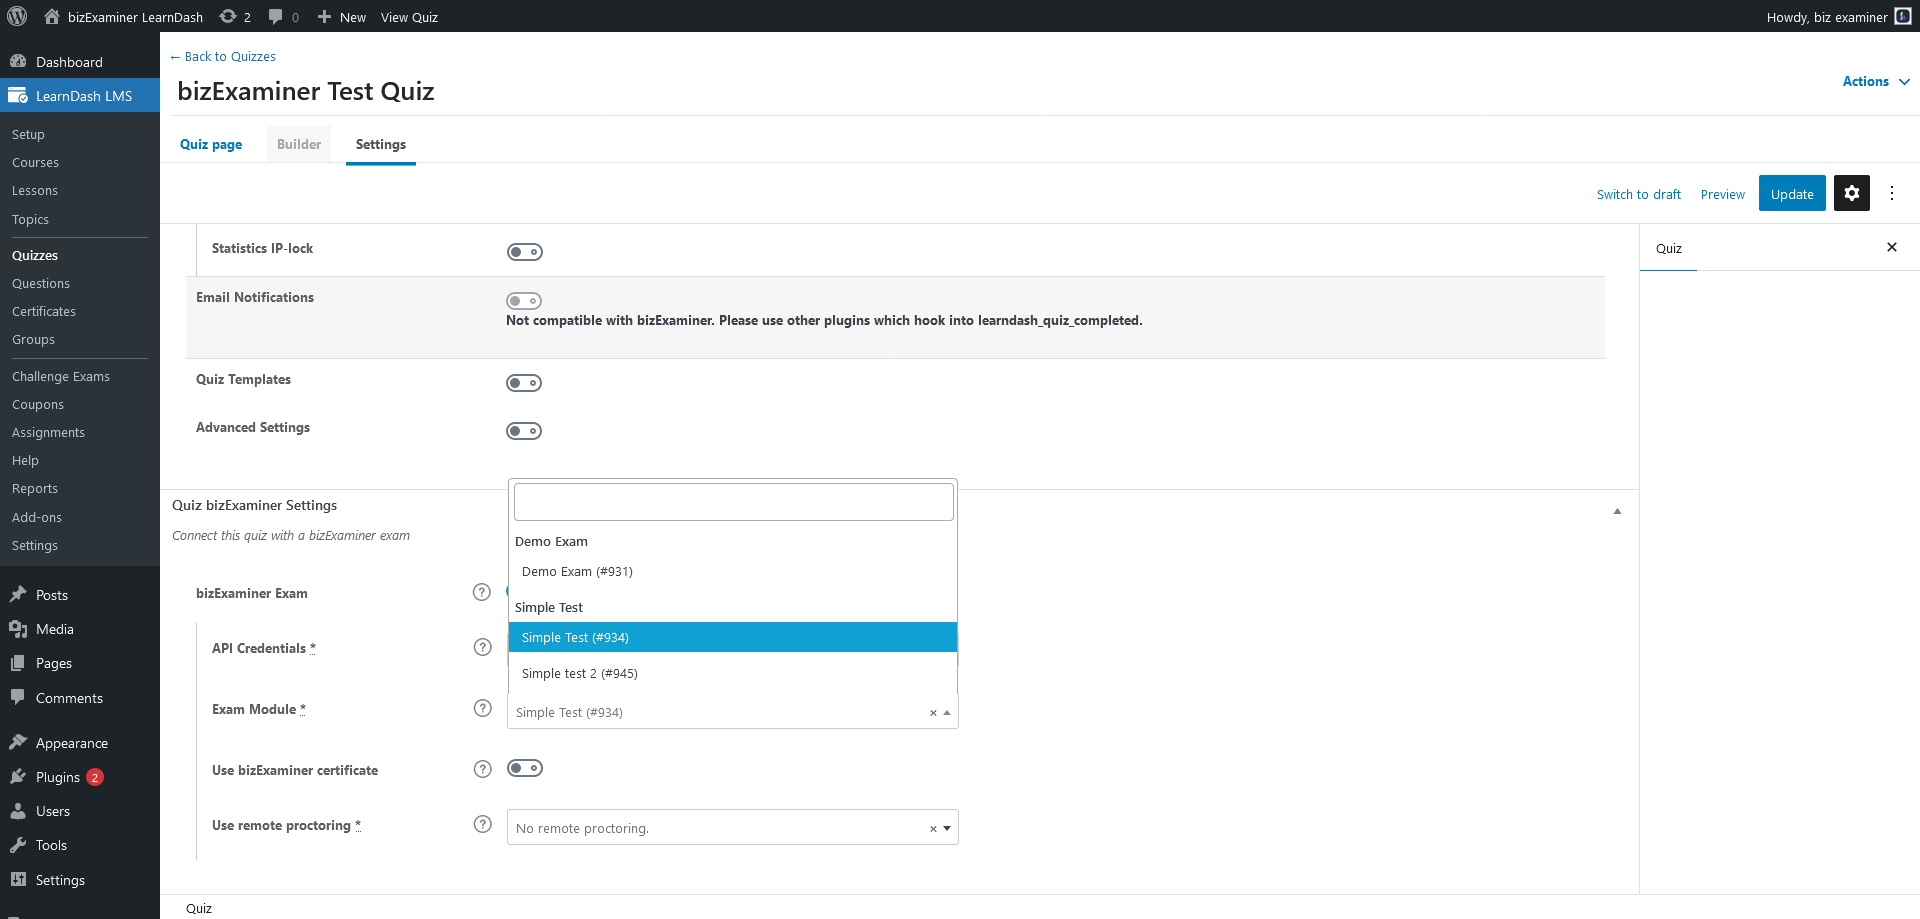
From the Exam Module list, choose an existing exam module from bizExaminer.
- You can optionally choose whether the user should be displayed a certificate that you have set up and designed in bizExaminer by toggling the Use bizExaminer certificate switch. If enabled, the LearnDash certificate feature is disabled for this quiz.
- Choose a remote proctoring integration. Depending on the selection, additional configuration might become visible.
To use bizExaminers advanced proctoring capabilities, a live remote proctoring integration has to be configured in bizExaminer. Available integrations are automatically displayed in the Use remove proctoring pull down field.
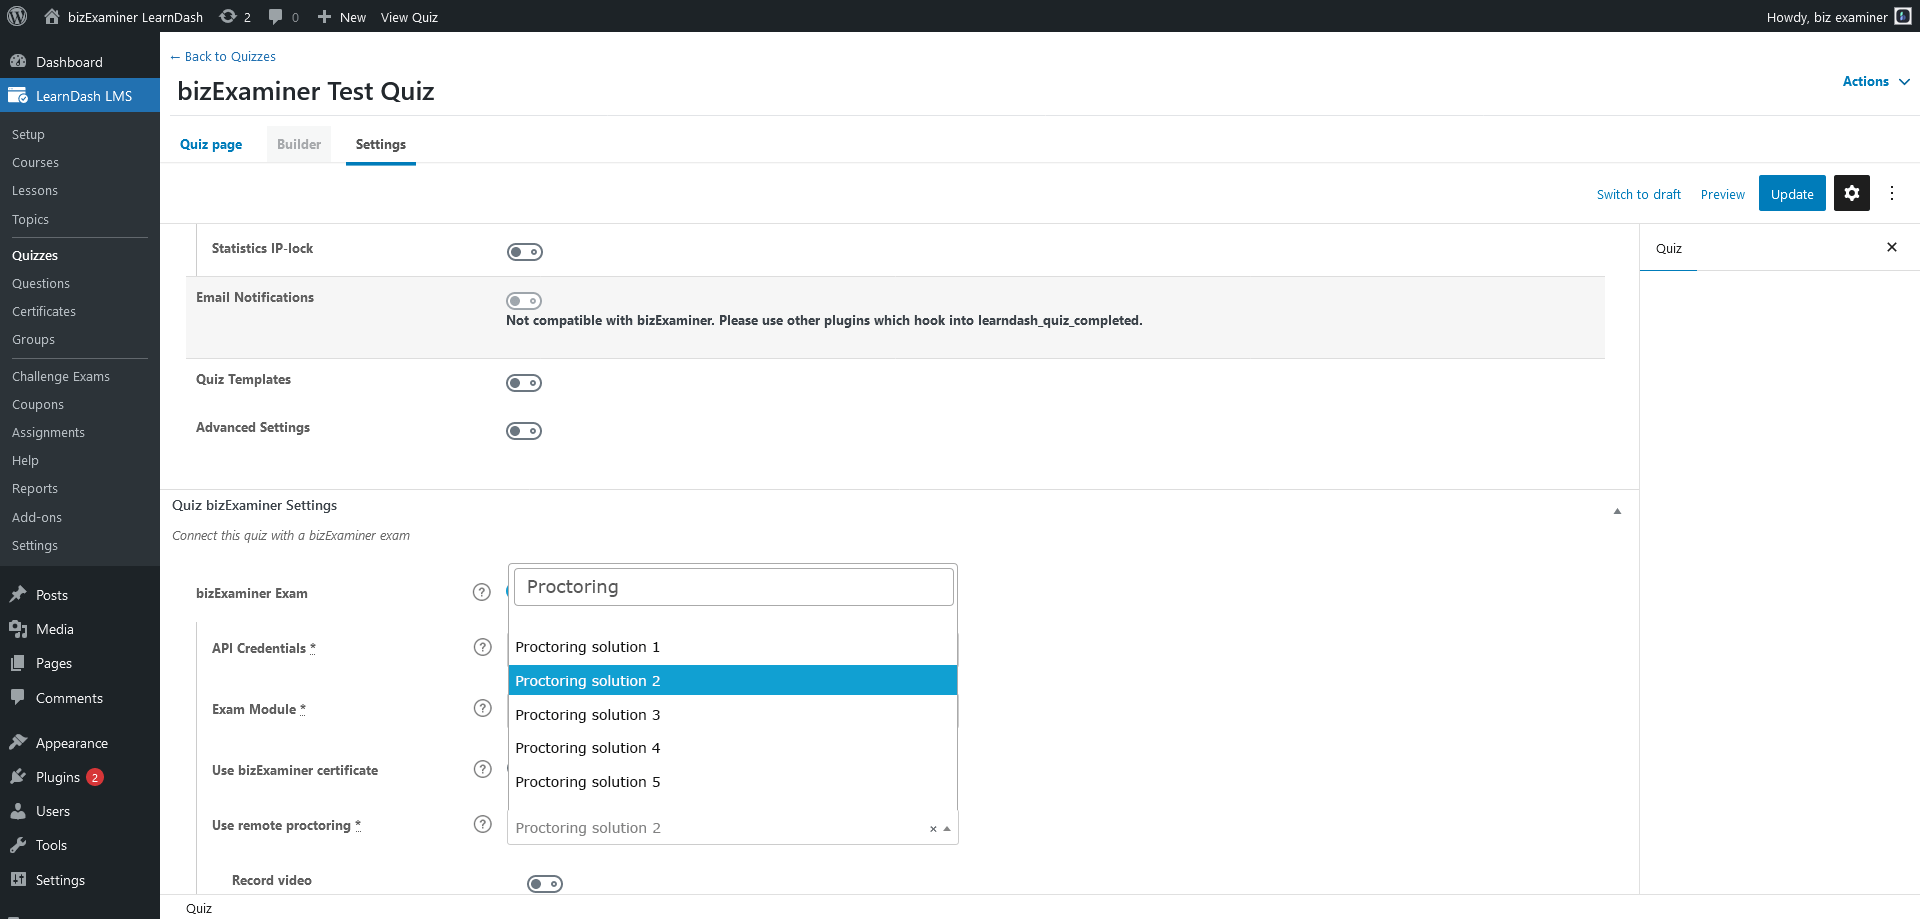
Available remote proctor integrations are automatically displayed in the Use remote proctoring pull down field.
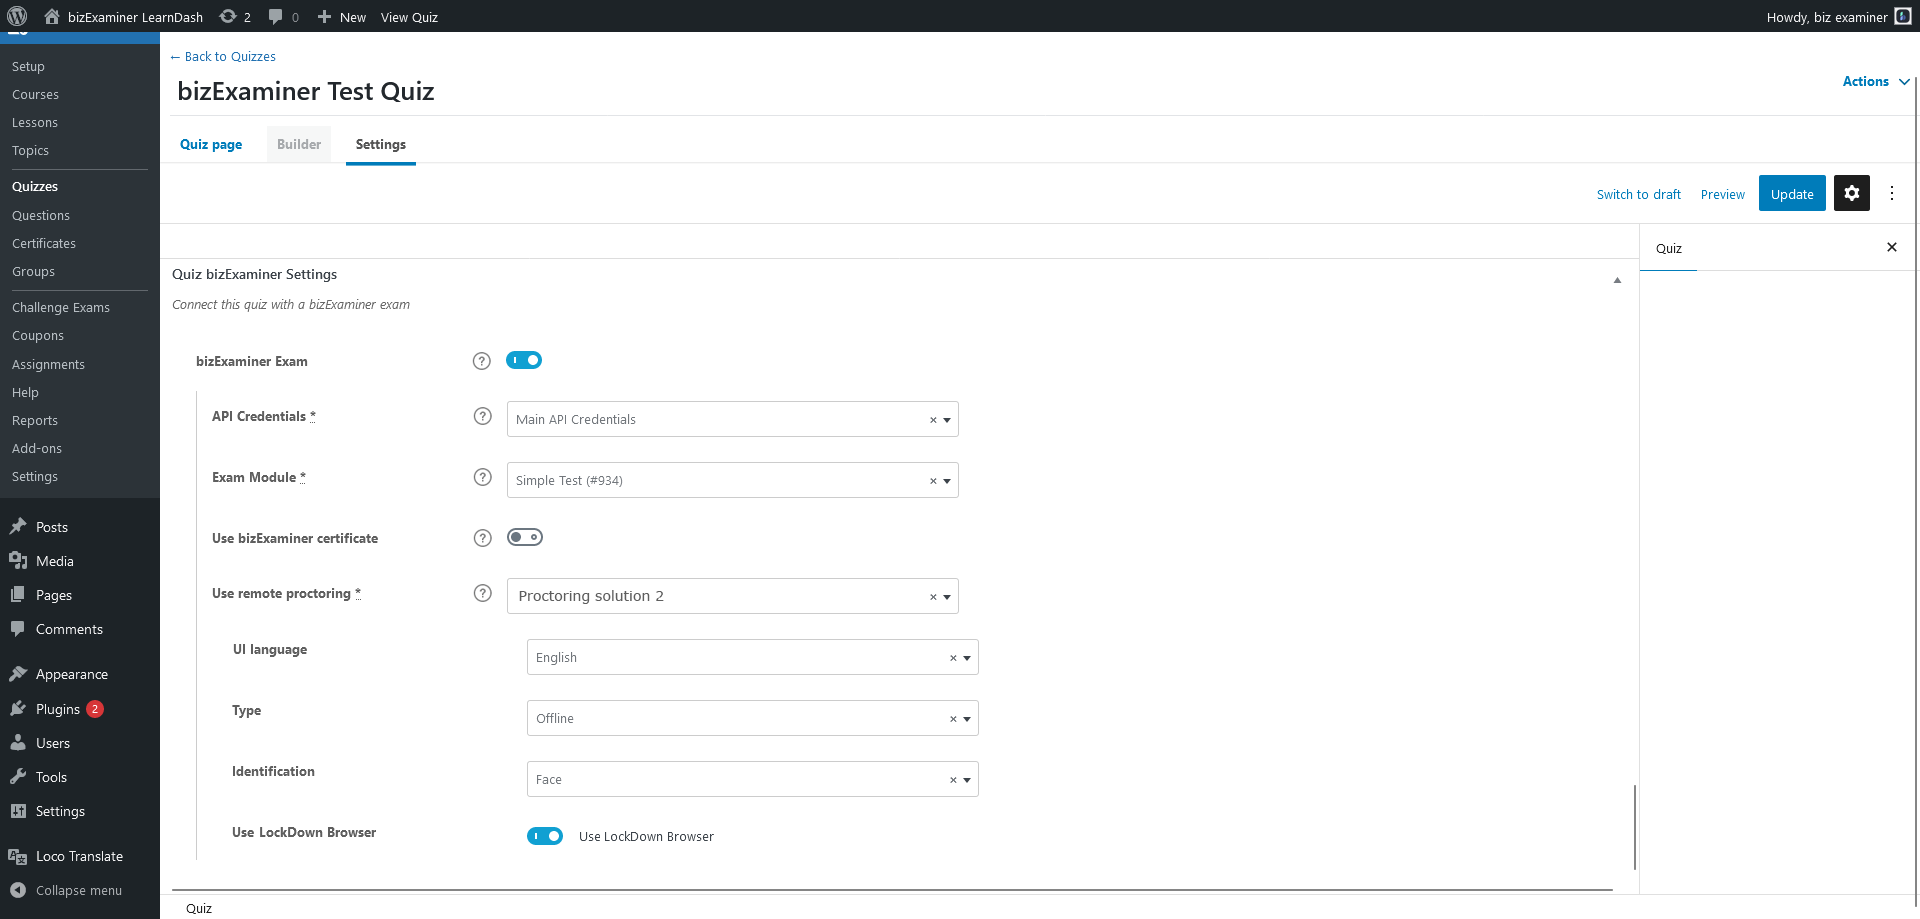
Depending on the selected remote proctoring integration, additional configuration might become visible.
- Continue to complete the configuration of the LearnDash quiz.
- Save & publish the quiz.
Incompatible LearnDash settings
Our extension works with most of the core LearnDash settings, however some are not compatible. These are marked as incompatible and disabled in the quiz settings by default. They include:
-
- Allowed Users: bizExaminer only works with registered/logged-in WordPress users to store the results.
- Passing Score: You can configure this in the exam in bizExaminer.
- Quiz Certificate: Disabled if you enable the bizExaminer certificate setting (see above).
- Enable Quiz Saving: bizExaminer allows the user to resume the quiz/exam when they open the quiz page while an attempt is still running.
- Question Completion: You can configure this in the exam in bizExaminer.
- Time Limit: You can configure this in the exam in bizExaminer.
- Question Display: You can configure this in the exam in bizExaminer.
- Question Overview Table
-
- Custom Question Ordering: You can configure this in the exam in bizExaminer.
- Additional Question Options
- Custom Results Display
-
-
- Average Score
- Category Score
-
- Custom Answer Feedback
- Email Notifications
-
- Not compatible with bizExaminer. Please use other plugins which hook into learndash_quiz_completed.
- bizExaminer still works with extensions triggering on quiz completion (e.g. BuddyBoss).
How users experience LearnDash exams connected to bizExaminer
When the user starts the quiz, they are automatically redirected to the bizExaminer exam. After they have finished the exam, they will get back to the default LearnDash results view
- User sees the quiz in LearnDash, and can click Start Quiz.
- The exam opens through bizExaminer in-page.
Note: If you have enabled remote proctoring for this quiz, the user is redirected to the remote proctoring page. - The user takes the exam.
- If the user should close the tab/window, they can resume the quiz from the LearnDash quiz page again, if this is enabled in the quiz settings.
- After the user finishes the exam, they are redirected to the LearnDashs results page and all results are displayed.
Import attempts from bizExaminer
Version 1.4.0 of our plugin added a feature to import attempts from bizExaminer, without users having to start the exam in LearnDash. You can even disable the starting in LearnDash.
Enable setting in quiz
To allow users to import their attempts from bizExaminer, you have to enabled “Import attempts” in the quiz bizExaminer settings.
Optionally, you can disable starting the quiz from LearnDash, if you want to use our plugin to only import attempts into LearnDash.

Allow users to import attempts
To allow users to import their results after they have completed the exam in bizExaminer, we’ve added two useful shortcodes.
The templates of the shortcode can be overwritten like any of our templates and use styles and CSS classes from LearnDash.
Table of all quizzes
[be_import_attempts_table show_completed=”false” button_label=”Claim” empty_message=”” course_id=””]
The be_import_attempts_table shortcode shows a table of all the quizzes the user is allowed to take and have “import attempts” enabled.
Arguments:
- show_completed (“false”,”true”,”1″,”0″ – default: false): Whether already done/finished quizzes should be shown.
- button_label (string – default: “Import”): The label for the import button.
- empty_message (string – default: see template): The message to show when no quizzes are available for import.
- course_id (string, int): The table only shows quizzes of one course. By default, the course context is calculated from the current page – e.g. if placed on a course page or quiz page, this course is used. If you place the table outside a course context, use this argument to explicitly define a course ID.

Button for single quiz
[be_import_attempts_button button_label=”Claim” quiz_id=”” show_completed=”1″]
The be_import_attempts_button shortcode shows a button to import the attempts for a single quiz.
Arguments:
- show_completed (“false”,”true”,”1″,”0″ – default: false): Whether the button should be shown if the quiz is already done/finished.
- button_label (string – default: “Import”): The label for the import button.
- quiz_id (string, int): By default the quiz ID is calculated from the current page – e.g. if placed on quiz page. If you place the button outside a quiz, use this argument to explicitly define a quiz ID.
Note: The quiz must have “import attempts” enabled for this to work.